We made Brushbots @hewittschool in our Maker Club! https://t.co/rht0H8WPp1
— Erik Nauman (@openblackboard) October 31, 2013
Saturday, November 02, 2013
Brushbots!


Monday, October 14, 2013
Music class for use with leJOS NXJ playNote and playTone methods
As an exercise I've written a Music class that makes writing NXT melodies easier by allowing note values to be passed instead of frequencies. I used this page as a reference: http://www.phy.mtu.edu/~suits/notefreqs.html. Any suggestions are appreciated. I hope someone finds it useful! Here's a little vid: http://blogs.hewittnet.org/robotics/files/2013/10/IMG_1008.mov
import lejos.nxt.Sound;
public class Music {
    private static String[] notes = { "C3", "C#3", "Db3", "D3", "D#3", "Eb3",
            "E3", "F3", "F#3", "Gb3", "G3", "G#3", "Ab3", "A3", "A#3", "Bb3",
            "B3", "C4", "C#4", "Db4", "D4", "D#4", "Eb4", "E4", "F4", "F#4",
            "Gb4", "G4", "G#4", "Ab4", "A4", "A#4", "Bb4", "B4", "C5", "C#5",
            "Db5", "D5", "D#5", "Eb5", "E5", "F5", "F#5", "Gb5", "G5", "G#5",
            "Ab5", "A5", "A#5", "Bb5", "B5", "C6" };
    private static float[] frequency = { 130.81f, 138.59f, 138.59f, 146.83f,
            155.56f, 155.56f, 164.81f, 174.61f, 185.0f, 185.0f, 196.0f,
            207.65f, 207.65f, 220.0f, 233.08f, 233.08f, 246.94f, 261.63f,
            277.18f, 277.18f, 293.66f, 311.13f, 311.13f, 329.63f, 349.23f,
            369.99f, 369.99f, 392.0f, 415.3f, 415.3f, 440.0f, 466.16f, 466.16f,
            493.88f, 523.25f, 554.37f, 554.37f, 587.33f, 622.25f, 622.25f,
            659.26f, 698.46f, 739.99f, 739.99f, 783.99f, 830.61f, 830.61f,
            880.0f, 932.33f, 932.33f, 987.77f, 1046.5f };
    /**
     * method uses playTone method
     * @param note is a String representation of the musical note in range C3-C6. See notes[] for allowed values
     * @param duration is note duration in ms
     */
    public void musicTone(String note, int duration) {
        for (int i = 0; i < notes.length; i++) {
            if(note.equals(notes[i])) {
                Sound.playTone((int)frequency[i], duration);
                Sound.pause(duration);
            }
        }
    }
    /**
     * method uses playNote method with Sound.XYLOPHONE as instrument argument
     * @param note is a String representation of the musical note in range C3-C6. See notes[] for allowed values
     * @param duration
     */
    public void musicXylo(String note, int duration) {
        for (int i = 0; i < notes.length; i++) {
            if(note.equals(notes[i])) {
                Sound.playNote(Sound.XYLOPHONE,(int)frequency[i], duration);
            }
        }
    }
    /**
     * method uses playNote method with Sound.PIANO as instrument argument
     * @param note is a String representation of the musical note in range C3-C6. See notes[] for allowed values
     * @param duration
     */
    public void musicPiano(String note, int duration) {
        for (int i = 0; i < notes.length; i++) {
            if(note.equals(notes[i])) {
                Sound.playNote(Sound.PIANO,(int)frequency[i], duration);
            }
        }
    }
    /**
     * method uses playNote method with Sound.FLUTE as instrument argument
     * @param note is a String representation of the musical note in range C3-C6. See notes[] for allowed values
     * @param duration
     */
    public void musicFlute(String note, int duration) {
        for (int i = 0; i < notes.length; i++) {
            if(note.equals(notes[i])) {
                Sound.playNote(Sound.FLUTE,(int)frequency[i], duration);
            }
        }
    }
}
Here is an example implementation of the class:
import lejos.nxt.Sound;

public class MusicTest {
    private static String[] melody = { "C4", "D4", "E4", "C4",
        "E4", "C4",    "E4"};

    public static void main(String[] args) {
        Music music = new Music();
        for (int i = 0; i < melody.length; i++) {
            music.musicPiano(melody[i], 300);
            System.out.println(melody[i]);
        }
        Sound.pause(300);
        for (int i = 0; i < melody.length; i++) {
            music.musicTone(melody[i], 300);
            System.out.println(melody[i]);
        }
    }
}
Sunday, October 06, 2013
Processing.js Save Part of Sketch Window
I'm working on a save feature for a web app for drawing musical compositions. I want to make sure you can save your drawn composition and reload them instead of having to recreate them. Processing.js has a save() method but I was thinking it was a dead end because it saves either the whole sketch window or a loaded image in the sketch, of which the drawn composition is neither. But this tip from the forum saved the day. Use get() to capture the region where the composition is drawn and define that as an image, then call save on that!
Now I just have to figure out how to load the saved image...
void trySaveImage() {
  if(mouseX > width-40 && mouseY < 40) {
    PImage drawWindow = get(20, top, width-20, height-top);
    drawWindow.save("drawing.png");
  }
}
Now I just have to figure out how to load the saved image...
Tuesday, September 24, 2013
Computer Science Texts
There is no best text to use in a computer science course, but I've found two that I'm really happy with for the high school robotics course I'm teaching this year. For the first semester we're programming Lego NXT robots with TETRIX building parts and motors and I have to support both Mac and PC os's, so I'm teaching Java. There's a great library for doing just this called leJOS NXJ and we're going over many of the Java concepts using the book Head First Java, 2nd edition.
For the second semester we'll be switching to Arduino and doing a mixture of physical computing and robotics projects. I am still working out the details of the curriculum, but I want to use Beginning C With Arduino by Jack Purdum as a base text. Purdum goes into the details of C concepts in a very clear and concise way while many other Arduino books give a lot of examples without giving much rhyme or reason as to why sample programs are written as they are. So I hope to highlight differences between techniques used in Java and C.
For the second semester we'll be switching to Arduino and doing a mixture of physical computing and robotics projects. I am still working out the details of the curriculum, but I want to use Beginning C With Arduino by Jack Purdum as a base text. Purdum goes into the details of C concepts in a very clear and concise way while many other Arduino books give a lot of examples without giving much rhyme or reason as to why sample programs are written as they are. So I hope to highlight differences between techniques used in Java and C.
Saturday, May 04, 2013
Using Switches with Arduino and Processing
The short story here is you can use INPUT_PULLUP when coding switches in Arduino but this is not available at the time of this post in the Arduino library for Processing if you want to code your switch that way. In the latter case you have to wire your switch with a pull-up or pull-down resistor.
Now the long story. The Arduino IDE 1.0.1 forward has added a very convenient argument to the pinMode() function for using switches. Instead of just setting a switch pin to pinMode(switchPin, INPUT) you can use pinMode(switchPin, INPUT_PULLUP). This uses the Arduino's internal resistors to pull a switch pin HIGH by default so you don't get fluctuating readings on your switch. The switch is really easy to wire this way, just wire from the input pin to the switch, then to ground. When you want to read whether the switch is pressed, use the condition if(digitalRead(switchPin==LOW)).
But the INPUT_PULLUP option is not available in the current arduino library for Processing, which allows Processing to talk to the Arduino through the Firmata firmware running on the Arduino. The Processing arduino library hasn't been updated since 2011 (11/11/11 to be exact--weird).
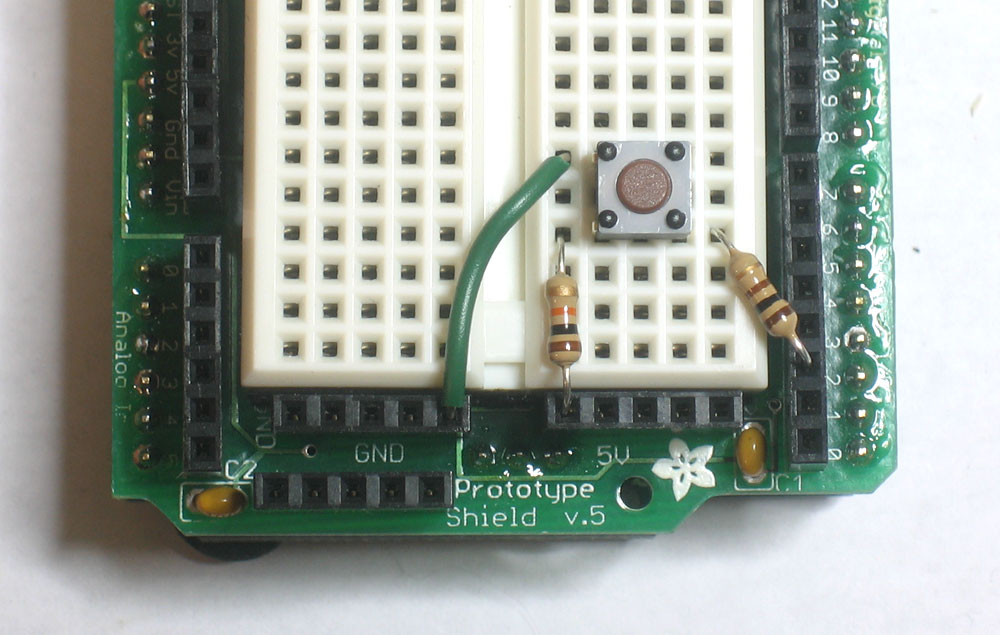
Without the use of the INPUT_PULLUP argument a switch has to be wired with a pull-up or pull-down configuration, which is a bit more complicated. This Ladyada tutorial covers the wiring of pull-up and pull-down resistors very nicely. The image below uses a pull-up resistor, in which the switch is connected on one side to its input pin with a 100 ohm resistor and to Vin with a 10K ohm resistor, and then to ground on its other side, pulling it high by default.
All of this came up in my classroom because I have a couple students working on a project where they want to press buttons to play audio files on their computer. So the Processing/Arduino configuration is necessary.
Now the long story. The Arduino IDE 1.0.1 forward has added a very convenient argument to the pinMode() function for using switches. Instead of just setting a switch pin to pinMode(switchPin, INPUT) you can use pinMode(switchPin, INPUT_PULLUP). This uses the Arduino's internal resistors to pull a switch pin HIGH by default so you don't get fluctuating readings on your switch. The switch is really easy to wire this way, just wire from the input pin to the switch, then to ground. When you want to read whether the switch is pressed, use the condition if(digitalRead(switchPin==LOW)).
 |
| Image source: arduino.cc |
Without the use of the INPUT_PULLUP argument a switch has to be wired with a pull-up or pull-down configuration, which is a bit more complicated. This Ladyada tutorial covers the wiring of pull-up and pull-down resistors very nicely. The image below uses a pull-up resistor, in which the switch is connected on one side to its input pin with a 100 ohm resistor and to Vin with a 10K ohm resistor, and then to ground on its other side, pulling it high by default.
 |
| Image source: ladyada.net |
Monday, April 01, 2013
Tricolor LED update: soldered up
I moved the led from breadboard to pc board, added a 9V to barrel plug and I have a nice little night light! I don't know how long the battery will last though...


Monday, March 25, 2013
Tricolor LED Project 3: Color mixing and Crossfades
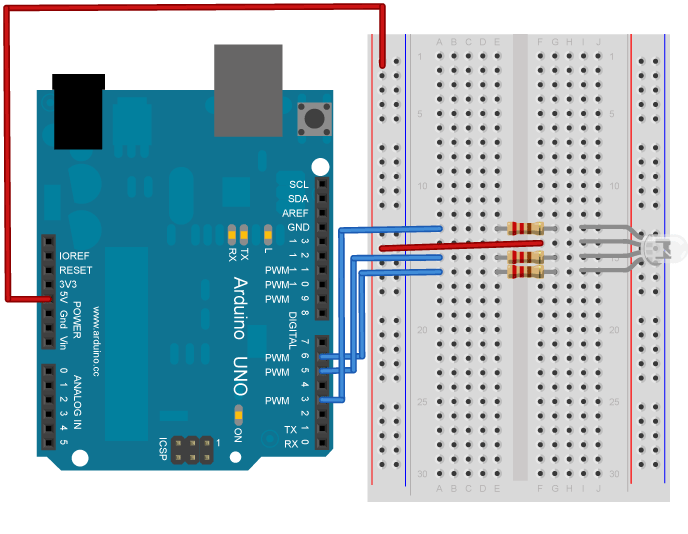
This project just uses Arduino and the tricolor LED to make random mixed colors and crossfades. The LED is wired like in this diagram: http://arduino.cc/en/uploads/Tutorial/readASCIIString_bb.png
Program code is below:


Program code is below:


Program code:
int r,g,b;
int LEDs[] = {r,g,b};

int brightness = 3;
int fadeAmount = 3;
int pick1,pick2,pick3;
int PICKS[] = {pick1,pick2,pick3};

void setup()  {
  for(int i = 0;i < 3;i++) {
    LEDs[i] = i+9;
    pinMode(LEDs[i],OUTPUT);
    PICKS[i] = random(3);
  }
  //Serial.begin(9600);
}

void loop()  {
  if(brightness == 3) {
    for(int i = 0;i < 3;i++) {
      PICKS[i] = random(3);
    }//end for
  }//endif
  for(int i = 0;i < 3;i++) {
      switch(PICKS[i]) {
      case 0:
        analogWrite(LEDs[i], brightness);
        break;
      case 1:
        analogWrite(LEDs[i], -brightness);
        break;
      case 2:
        analogWrite(LEDs[i], 255);
        break;
      }//end switch
  }//end for
  brightness += fadeAmount;
  if (brightness < 4 || brightness == 255) {
    fadeAmount = -fadeAmount ;
  }
  delay(30);
}
Tricolor LED Project 2: Color Slider
Processing and Arduino project 2 uses a tricolor LED and a screen interface to mix colors with sliders. That's a ping pong ball on the LED. The LED is wired like in this diagram: http://arduino.cc/en/uploads/Tutorial/readASCIIString_bb.png. Remember when doing projects with Arduino thru Processing, follow these steps: http://playground.arduino.cc/interfacing/processing
The code is published below:


Main code:
//arduino begin
import processing.serial.*; //for serial communication with any device
import cc.arduino.*; //for Arduino library methods
Arduino arduino; //create Arduino object from library
int rd = 9;
int blu = 10;
int grn = 11;
//arduino end
Circle circle;
Slider[] slider = new Slider[3];
int[] xpos = new int[3];
int[] ypos = new int[3];

void setup() {
  //arduino begin
  println(Arduino.list());//show me which COM port Arduino is using
  arduino = new Arduino(this, Arduino.list()[4], 57600);
  arduino.pinMode(rd, Arduino.OUTPUT);
  arduino.pinMode(blu, Arduino.OUTPUT);
  arduino.pinMode(grn, Arduino.OUTPUT);
  //arduino end
  size(500,530);
  smooth();
  for (int i = 0; i < xpos.length; i++) {
    xpos[i] = (i+1)*30;
  }
  noStroke();
  circle = new Circle();
  for(int i = 0; i < slider.length; i++) {
    slider[i] = new Slider();
    ypos[i] = height-10;
  }//end for
}//end setup

void draw() {
  background(100);
  circle.setColorVars();
  circle.display();
  for(int i = 0; i < slider.length; i++) {
    int[] r = {255,0,0};
    int[] g = {0,255,0};
    int[] b = {0,0,255};
    slider[i].displayRect(r[i],g[i],b[i],xpos[i]);
    slider[i].displayHandle(xpos[i],ypos[i]);
  }//end for
}//end draw

void mouseDragged() {
  for(int i = 0;i < slider.length; i++) {
    slider[i].dragging();
  }
}
Circle class:
Slider class:class Circle {
int r = 0;
int g = 0;
int b = 0;
PFont f;
Circle() {
f = createFont("Arial", 30,true);
textFont(f);
}//end const
void setColorVars() {
r = 255 - ypos[0]/2+5;
g = 255 - ypos[1]/2+5;
b = 255 - ypos[2]/2+5;
}
void display() {
fill(r,g,b);
ellipse(width/2+50,height/2,250,250);
textAlign(CENTER);
text("(" + r + "," + g + "," + b + ")", width/2+50,40);
arduino.analogWrite(rd,255-r);
arduino.analogWrite(blu,255-b);
arduino.analogWrite(grn,255-g);
}//end void
}//end class
class Slider {
  int btm = height-10;
  int tp = 10;

  Slider() {
  }

  void displayRect(int r, int g, int b, int x) {
    fill(r,g,b);
    rectMode(CENTER);
    rect(x,height/2,20,510);
  }

  void displayHandle(int x, int y) {
    fill(0);
    rectMode(CENTER);
    rect(x,y,20,20);
  }

  void dragging() {
    if(mouseY >= tp && mouseY <= btm) {
      if(dist(mouseX,mouseY,xpos[0],ypos[0]) < 15) {
        ypos[0] = mouseY;
      }//endif
      if(dist(mouseX,mouseY,xpos[1],ypos[1]) < 15) {
        ypos[1] = mouseY;
      }//endif
      if(dist(mouseX,mouseY,xpos[2],ypos[2]) < 15) {
        ypos[2] = mouseY;
      }//endif
    }//endif
  }//end void
} //end class
Tricolor LED Project 1: Color Picker
I'm using Processing and Arduino to make some interactive light projects with a tricolor LED with some nice results. The first is an app that shows how digital colors mix. That's a ping pong ball on the LED. The LED is wired like in this diagram: http://arduino.cc/en/uploads/Tutorial/readASCIIString_bb.png. Remember when doing projects with Arduino thru Processing, follow these steps: http://playground.arduino.cc/interfacing/processing
The code is published below:


Button class:
Led class:
The code is published below:


//COMMON ANODE TO 5V
import processing.serial.*; //for serial communication with any device
import cc.arduino.*; //for Arduino library methods
Arduino arduino; //create Arduino object from library
Circle circle;
Button[] button = new Button[3];
Led[] led = new Led[3];
boolean r_on,g_on,b_on;

void setup() {
  println(Arduino.list());//show me which COM port Arduino is using
  arduino = new Arduino(this, Arduino.list()[4], 57600);
  size(500,500);
  smooth();
  noStroke();
  circle = new Circle();
  for(int i = 0; i < button.length; i++) {
    button[i] = new Button();
    led[i] = new Led();
  }//end for
}//end setup

void draw() {
  background(100);
  if(r_on && !g_on && !b_on) {
    circle.setColor(255,0,0);
    for(int i = 0;i < button.length; i++) {
      button[i].redOn();
      led[i].redOn();
    }//endfor
  } else if(!r_on && g_on && !b_on) {
    circle.setColor(0,255,0);
    for(int i = 0;i < button.length; i++) {
      button[i].greenOn();
      led[i].greenOn();
    }//endfor
  } else if(!r_on && !g_on && b_on) {
    circle.setColor(0,0,255);
    for(int i=0; i < button.length; i++) {
      button[i].blueOn();
      led[i].blueOn();
   }//endfor
  } else if(r_on && g_on && !b_on) {
    circle.setColor(255,255,0);
    for(int i=0; i < button.length; i++) {
      button[i].yellowOn();
      led[i].yellowOn();
    }//endfor
  } else if(r_on && !g_on && b_on) {
    circle.setColor(255,0,255);
    for(int i=0; i < button.length; i++) {
      button[i].magentaOn();
      led[i].magentaOn();
    }//endfor
  } else if(!r_on && g_on && b_on) {
    circle.setColor(0,255,255);
    for(int i=0; i < button.length; i++) {
      button[i].cyanOn();
      led[i].cyanOn();
    }//endfor
  } else if(r_on && g_on && b_on){
    circle.setColor(255,255,255);
    for(int i=0; i < button.length; i++) {
      button[i].whiteOn();
      led[i].whiteOn();
    }//endfor
  } else {
    circle.setColor(0,0,0);
    for(int i = 0; i < button.length; i++) {
      button[i].blackOn();
      led[i].blackOn();
    }//endfor
  }//endelse
  circle.display();
}//end draw

void mousePressed() {
  if(dist(mouseX,mouseY,width/4,height/5*4) < 25) {
    r_on = !r_on;
  }
  if(dist(mouseX,mouseY,width/2,height/5*4) < 25) {
    g_on = !g_on;
  }
  if(dist(mouseX,mouseY,width/4*3,height/5*4) < 25) {
    b_on = !b_on;
  }
}//end void
class Circle {
  int rC = 0;
  int gC = 0;
  int bC = 0;
  PFont f;

  Circle() {
    f = createFont("Arial", 30,true);
    textFont(f);
  }//end const

  void setColor(int red,int green, int blue) {
    rC = red;
    gC = green;
    bC = blue;
  }//end void

  void display() {
    fill(rC,gC,bC);
    ellipse(width/2,height/2-50,250,250);
    textAlign(CENTER);
    text("(" + rC + "," + gC + "," + bC + ")", width/2,40);
  }//end void
}//end class
Button class:
class Button {
  //arrays for r,g,b values for 3 buttons
  int[] r = new int[3];
  int[] g = new int[3];
  int[] b = new int[3];
  int[] xpos = new int[3];

  Button() {
  xpos[0] = width/4;
  xpos[1] = width/2;
  xpos[2] = width/4*3;
}

  void display(int br, int bg, int bb, int x) {
    fill(br,bg,bb);
    ellipse(x,height/5*4,50,50);
  }

  void redOn() {
    for(int i=0; i < button.length; i++) {
      if(i == 0) {
        r[i] = 255;
      } else {
        r[i] = 0;
      }
      g[i] = 0;
      b[i] = 0;
      button[i].display(r[i],g[i],b[i],xpos[i]);
    }
  }

  void greenOn() {
    for(int i=0; i < button.length; i++) {
      if(i == 1) {
        g[i] = 255;
      } else {
        g[i] = 0;
      }
      r[i] = 0;
      b[i] = 0;
      button[i].display(r[i],g[i],b[i],xpos[i]);
    }//endfor
  }//endvoid

  void blueOn() {
    for(int i=0; i < button.length; i++) {
      if(i == 2) {
        b[i] = 255;
      } else {
        b[i] = 0;
      }
      r[i] = 0;
      g[i] = 0;
      button[i].display(r[i],g[i],b[i],xpos[i]);
    }//endfor
  }//endvoid

  void yellowOn() {
    for(int i=0; i < button.length; i++) {
       if(i == 0) {
        r[i] = 255;
      } else {
        r[i] = 0;
      }
       if(i == 1) {
        g[i] = 255;
      } else {
        g[i] = 0;
      }
      b[i] = 0;
      button[i].display(r[i],g[i],b[i],xpos[i]);
    }//endfor
  }//endvoid

  void magentaOn() {
    for(int i=0; i < button.length; i++) {
       if(i == 0) {
        r[i] = 255;
      } else {
        r[i] = 0;
      }
       if(i == 2) {
        b[i] = 255;
      } else {
        b[i] = 0;
      }
      g[i] = 0;
      button[i].display(r[i],g[i],b[i],xpos[i]);
    }//endfor
  }//endvoid

  void cyanOn() {
    for(int i=0; i < button.length; i++) {
       if(i == 1) {
        g[i] = 255;
      } else {
        g[i] = 0;
      }
       if(i == 2) {
        b[i] = 255;
      } else {
        b[i] = 0;
      }
      r[i] = 0;
      button[i].display(r[i],g[i],b[i],xpos[i]);
    }//endfor
  }//endvoid

  void whiteOn() {
    for(int i=0; i < button.length; i++) {
       if(i == 0) {
        r[i] = 255;
      } else {
        r[i] = 0;
      }
       if(i == 1) {
        g[i] = 255;
      } else {
        g[i] = 0;
      }
       if(i == 2) {
        b[i] = 255;
      } else {
        b[i] = 0;
      }
      button[i].display(r[i],g[i],b[i],xpos[i]);
    }//endfor
  }//endvoid

  void blackOn() {
    for(int i=0; i < button.length; i++) {
      button[i].display(0,0,0,xpos[i]);
    }//endfor
  }//endvoid
}//end class
Led class:
class Led{
  int rd,blu,grn;
  int colors[] = {rd,blu,grn};//array for LED colors

  Led() {
    for(int i = 0; i < colors.length; i++) {
      colors[i] = i+9;//assign arduino pins
      arduino.pinMode(colors[i], Arduino.OUTPUT);//pins to output
    }
  }

  void redOn() {
    for(int i=0; i < button.length; i++) {
      //array is "rd,blu,grn", LOW is on, HIGH is off!
      if(i == 0) {
        arduino.digitalWrite(colors[i], Arduino.LOW);
      } else {
        arduino.digitalWrite(colors[i], Arduino.HIGH);
      }
    }//endfor
  }//endvoid

  void greenOn() {
    for(int i=0; i < button.length; i++) {
      if(i == 2) {
        arduino.digitalWrite(colors[i], Arduino.LOW);
      } else {
        arduino.digitalWrite(colors[i], Arduino.HIGH);
      }
    }//endfor
  }//end void

  void blueOn() {
    for(int i=0; i < button.length; i++) {
      if(i == 1) {
        arduino.digitalWrite(colors[i], Arduino.LOW);
      } else {
        arduino.digitalWrite(colors[i], Arduino.HIGH);
      }
    }//endfor
  }//end void

  void yellowOn() {
    for(int i=0; i < button.length; i++) {
      if(i == 1) {
        arduino.digitalWrite(colors[i], Arduino.HIGH);
      } else {
        arduino.digitalWrite(colors[i], Arduino.LOW);
      }
    }//endfor
  }//end void

  void magentaOn() {
    for(int i=0; i < button.length; i++) {
      if(i == 2) {
        arduino.digitalWrite(colors[i], Arduino.HIGH);
      } else {
        arduino.digitalWrite(colors[i], Arduino.LOW);
      }
    }//endfor
  }//end void

  void cyanOn() {
    for(int i=0; i < button.length; i++) {
      if(i == 0) {
        arduino.digitalWrite(colors[i], Arduino.HIGH);
      } else {
        arduino.digitalWrite(colors[i], Arduino.LOW);
      }
    }//endfor
  }//end void

  void whiteOn() {
    for(int i=0; i < button.length; i++) {
      arduino.digitalWrite(colors[i], Arduino.LOW);
    }//endfor
  }//end void

  void blackOn() {
    for(int i=0; i < button.length; i++) {
      arduino.digitalWrite(colors[i], Arduino.HIGH);
    }//endfor
  }//end void
}//endclass
Sunday, February 10, 2013
Pygame on 64-bit Mac OS
I'm in the process of porting my instructional programming environment from Windows to Mac (10.8). That's Processing, Arduino, Python, Pygame, HTML editors and FTP apps, Scratch, Logo for GoGo Board.
- Processing: easy, but connecting to an Arduino through Processing, still working on it
- Arduino: easy
- Python: tricky, downgrade to 2.7.3 for 32-bit, then Pygame will run.
- Pygame: easy, once above is done
- FileZilla: easy
- HTML editor, TextWrangler
- Scratch: easy, 2.0 is now online!
- Logo for GoGo Board: no Mac driver? Not sure but working on it.
Subscribe to:
Posts
(
Atom
)