
I wrote about this a couple years back and I have significantly refined this process so I figured I would provide an update. I still find melted and flattened HDPE plastic to be a useful building material for projects as long as the project specs require something simple like a box, backing, or frame. I've developed a pretty simple workflow that anyone can do with limited tools.
Here are the tools I find most essential for this process:
- Panini press: Brothers Make recommend Breville and I do find it works well because of the flat plate. Others have pronounced ridges or waffle patterns that make it harder to press your plastic in smooth and flat pieces.
- Parchment paper: Essential for keeping the plastic from sticking to the press.
- Grilling tongs to grab and manipulate hot plastic.
- Tin snips to easily cut plastic containers into smaller chips.
- Silicone oven mitts: Any brand really, but very useful for twisting and stretching the plastic with your hands.
- Tortilla press (cast iron like this is better than aluminum): This tool gives good leverage for compressing up to 5 inch disks of plastic during the cool down process. I also figured out that a trigger clamp can be used to hold it tight while it cools. For a while I used two laminated shelf boards that I would stand on and then add a heavy weight for the cooling down but the results were inconsistent and the task tiresome.
- And watch this great resource by Brothers Make on their process, in which much is explained.
Collect Plastic

It has to be #2 recycling code, or HDPE, which has a lower melting temperature than other recyclable plastics. Remove any labels and rinse/wash them thoroughly. You can soak paper labels to remove them but be aware left over glue will burn and leave a brown color mixed throughout translucent plastic.
Use tin snips to cut them up into 1-2 inch chips.
Melt the Plastic

Distribute the plastic pieces on the parchment paper in the panini press, close the lid and let it melt for about 10 minutes. Multiple videos I've watched claim the plastic does not get hot enough to release harmful fumes in the air but I remain skeptical so if you don't have a mask suitable for filtering toxic gases do this part outside or at least with very good ventilation.
After 10 minutes the plastic should be good and melted, at which point I peel it away from the paper with tongs and fold it together so it becomes one blob. I then pick it up with the silicone mitts and stretch and twist it several times. This reduces air pockets and bubbles and creates a nice marbling of different colors.
Press the Plastic
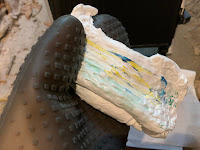
Give the stretched plastic another couple minutes on the panini press to bring the temperature back up, then place it on the tortilla press. I compress it a few times in different rotations and then apply the trigger clamp to hold it in place for 10-15 minutes. That gives it enough time to cool down enough to pick up with bare hands and cool it off under tap water. Flip it between both sides as the water cools it down so it doesn't cool unevenly, causing it to warp towards the colder side. You will end up with 4-5 inch disks that range in thickness from 1/8 - 1/4 inch.

UPDATE: Well I pressed too hard and the top plate of the tortilla press broke. So don't press too hard!
Working With Plastic to Make Things
Making with plastic is like making with wood in some respects. It's easy to saw the disks into the dimensions you need with a hand saw (I like using the crosscut side of a Japanese Ryoba saw) or band saw. You can cut rough dimensions with a saw and refine your cuts with a chisel or even block plane—very satisfying to use.
Fastening pieces together, however, presents more of a challenge. Small wood screws can work well, though the pressed plastic surfaces tend to be uneven in places so the fit may not be perfectly flush. Another option, demonstrated by Brothers Make, is welding joints together. This can work very well, though it takes some ingenuity in figuring out how to heat adjoining edges as a form like a box has more sides fixed in place. It's also good to add about 1/8" to your piece dimensions as some dimension is lost as melted edge material is pressed together.

2 comments :
Hi,
I'm Wendy from PCBWay marketing team, PCBWay is a global electronics manufacturing services company. Nice to meet you!
After viewing the content on your website, we have become very interested in working with your website.
Here is a brief description of our manufacturing capabilities. If you are interested in working with us, please write to us to discuss.
Polyethylene film greenhouses provide optimal light transmission and insulation, creating an ideal environment for plant growth. A Polyethylene film greenhouse is durable, flexible, and cost-effective, making it popular for both commercial and home gardening. This protective cover helps regulate temperature and humidity, promoting healthier and more productive crops year-round.
Post a Comment