Saturday, July 23, 2011

Multi-user Sim-on-a-stick

CAUTION: This is a pretty old post, SoaS may have changed, probably has. Just keep in mind...
I love how accessible Sim-on-a-stick makes OpenSimulator. Just plug it in and double click one batch file and after a succession of pretty windows a virtual world awaits. It's like a virtual Rube Goldberg machine unfolding right before your eyes. By default the Sim-on-a-stick flavor of Opensim is for a single user. So teachers with access to a bunch of PCs (yes, it only runs on PCs so far, but I'm sure some dedicated people will figure it out for Mac) could make as many copies on USB drives as they have students, hand them out, and let students manage their own personal sims. Or students could pair up or whatever.

I mentioned in a previous post that an adventurous teacher could configure a Sim-on-a-stick for multiple users, so you'd have all of your students logging into the same sim from their own computers. This would be nice for collaborating on a project, like when I had students build The Parthenon together. In keeping with the Sim-on-a-stick's ease-of-use, here's a step-by-step to doing that. So here goes.

You can go ahead and plug in your USB stick, download the latest version of Sim-on-a-stick from the website and unzip it to the stick. Before you run the Opensim_autostart you have to change a few things.
First, open the folder 'config-include' on the stick at the path in the image.
Find the file 'MyWorld.ini'. 
Right click on it and open it with Notepad.
Before you can make the necessary changes to it, you need to know your computer's IP address. So click Start and in the search bar (or Run window if on XP) type 'cmd' and hit enter.
At the C: prompt, type 'ipconfig' and hit enter.
Many lines will fly by, but just scroll back up until you find the section for your IP address. Now, if you are connecting to your network wirelessly, look for the IPv4 Address under the Wireless section. But this setup will cause considerable lag for your students in the sim. Better to connect with an ethernet cable, in which case you will find your IP address in that section. Write down that number. You can type exit and hit enter to close the command line. NOTE: Your IP address does not stay the same, but is likely to change whenever you restart this computer. So to keep this setup you can just not turn off this computer, otherwise do a quick check on the command line to see that it hasn't changed. If it has, you'll need to modify the IP address settings you make in the following steps and to the students' viewers when they log in.
Go back to MyWorld.ini and find the line under [GridService] with the IP 127.0.0.1 and change that to the IP you found with ipconfig. Save and close that file. UPDATE: In practice I've found it best to change ALL occurrences of the IP in MyWorld.ini, just do a search and replace.
Now go up one folder and find the Regions folder and open that.
Find the RegionConfig.ini file, right click on it and open it in Notepad.
In this file, find all 4 occurrences of the ExternalHostName IP address of 127.0.0.1 and change them to your IP. Save and close this.
NOW you can double click the Opensim_autostart file. Sit back and watch the pretty text and windows fly by. The last thing to open will be the Imprudence viewer. When that opens you'll see orange planets on a black background. 
At this point you have the option of creating your students' accounts for them or letting them create accounts when they log in. If you choose the former, click "CREATE ACCOUNT" and fill in the relevant information for each of your students. 
To log in to your sim, use the Simona Stick (pswd: 123) account and log in using the fields at the bottom. So now you are logged in and your students have accounts (or will make them).
Now for your students! They will need the Imprudence viewer on their computers for them to log in to your sim, so you will have to get that installed. 
Once they open it they will see a different default screen. They should click the Grid Manager button, click Add new grid, for Grid Name type whatever name you want for your sim, and MOST IMPORTANTLY, for Login URI they need to type http://your.IP.add.ress:9000/wifi (NOTE: in a recent version this has been changed to http://your.IP.add.ress:9100/wifi), and the same under Login page. This will direct their viewer to your computer where your sim will be running.  
They can click OK and select that sim in the grid dropdown. Once they select it they should also be seeing the orange planets.
From here they either create their accounts or simply log in! Then the fun can begin!
Ahh, a couple more things. Your entire operation is running on the USB drive, so don't ever pull it out while you have the world running! And you can't just X out of the various windows to shut down. Here's the shutdown process:
Make sure your students are logged out of the sim and log out yourself (In Imprudence, File > Quit).
Now at the Opensim console, type 'shutdown' and hit enter. Various shutdown processes will commence and that window will close.
Then go to the MoWeS window and click 'Stop server'. Wait until both Apache and MySQL are not running, and click 'End'. Now you can take out the USB drive.

Tuesday, July 19, 2011

Controlling LED from a web page with Arduino and Ethernet Shield

I figured out how to make my Arduino into a web server pretty quickly, especially since the example program does just that. What was hard was to go the other way, controlling it from a web page. I got that working finally by cobbling together bits and pieces of this project and this project. What I wanted was a couple of form input buttons that would turn on and off an LED. That's what this does. One issue I still have is the first time you submit the Arduino responds immediately but from then on you have a passed value in the URL and for some reason you have to click twice to get the Arduino to respond. Actually it does respond the first click but goes back to its previous state, then stays on the new state on the second click. Something more complicated is going on than I can yet understand. Anyway, it's cool and now I think lots of possibilities are opened up.
Well, I tried posting the code here but the WYSIWYG eats a lot of it, so here it is in a txt file, linked here.
UPDATE: Ha, an anonymous reply (thanks!) solved my double-click problem. Add a break; after each digitalWrite which makes sense now:

if(c == '0') {
digitalWrite(9, LOW);
break;
}
if(c == '1') {
digitalWrite(9, HIGH);
break;
}


Wednesday, July 13, 2011

We've Come A Long Way


A few clicks and a new Kitely
world is made.
"I've just upgraded to the newest version of OpenSim using Diva's Distribution, which makes all of the following pretty much obsolete. I'm just keeping the old steps below so I can look back some day and appreciate how far it's all come." I'm quoting myself from two years ago, when I started messing with virtual worlds, and it's come time to take that look and appreciate where we are.
Sim-on-a-stick is starting up a new
region after running one batch file!
Two years ago the drama teacher in my school wanted to explore having his students act with avatars. After looking into Second Life and There it was clear to me that a private OpenSimulator sim was the only option for our small experiment. The learning curve was steep for me and the consequences of deploying alpha software (v 0.6.3!) in an environment where we depended on it working with students ready to go was tough. We started our little acting project with few props, inventory we thought was lost that really wasn't because of DB connection timeouts, awkward kludges with FreeSWITCH, and a host of other issues.
The release of the Diva Distribution in the fall of 2009 was a major advance for me, with the helpful readme files and update and configure utilities. Despite this fantastic advance in OpenSimulator's ease of use, you still had to be a brave enough educator to install a MySQL database and mess with .ini files. These basic procedures have been prohibitive enough to keep the educators I've shown to keep their feet out of the virtual water.
A new me in seconds on Kitely
Well, that is all changing because of Kitely and sim-on-a-stick. I'd been hearing about these options over the last month or so, longer for sim-on-a-stick, but only had time to try them out a few days ago. I'm still buzzing from how easy both of these options are. With either one, you are up and running a sim in a few minutes with no back-end messing required. Each option has certain limitations compared to, say, paying for more full service sim hosting or running your own public grid from the ground up rather than on a stick.
In the case of Kitely, you don't have access to the back end at all but you can upload an OAR file at the time you create a new world. Pricing is extremely affordable and the team is very responsive to new feature requests and working hard to give users what they want.
Sim-on-a-stick (you'll find the relevant credits here) is an amazing new development that packages everything you need to run a sim on a USB drive. Having gone through the agony of making countless mistakes setting up this and that service and database and version of .NET and hunting down the meanings of various error messages I watch the pretty windows scroll by and things happening on their own after running ONLY ONE BATCH FILE and I'm just speechless at the magic of it.
Being the innovation enthusiast and teacher support person I am, I always think of how it will look to the first time non-geek teacher. I think the command lines of sim-on-a-stick, pretty as they are, will freak some people out, which may make Kitely, which hides all that scary-looking business, behind a clean and simple web front-end. But one thing that's beautiful about sim-on-a-stick is you can just say don't touch your computer until it's time to log in. And then there will be some adventurous people who will enjoy getting under the hood and, say, looking up their local IP, adding that to the bin\config-include\MyWorld.ini and bin\Regions\RegionConfig.ini files in place of 127.0.0.1 so that students on other computers in their LAN can direct their own Imprudence viewer to that IP and log in to the same sim-on-a-stick on your computer (the sim has to run on a PC for now, by the way, but the clients can be on Macs). I tried this today on a hunch and it rocked! Wired connections are best, of course. Then you have a collaborative environment and not just a single user operation. Before you do this, of course, you have to run the Diva Wifi service on the stick and create the new users for the students. Or even have the students create their own accounts by having their viewers directed to http://ip.add.re.ss:9000/wifi.
Anyway, all of this signals good times ahead for learning in virtual worlds! 

Thursday, June 23, 2011

You Wanna Buy a Parthenon?

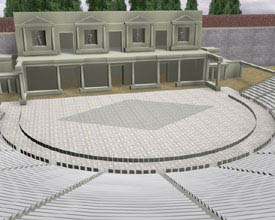
Actually it's free! This OAR file contains terrain modeled on the Athens Acropolis, a model of the Theatre of Dionysus built by me, and a model of the Parthenon built by about 40 8/9th grade students in their geometry class this past October. The models are built to scale, which was the point of having students do it as a geometry activity. The only thing that is way off is the Acropolis itself, which should be about twice as big, but it would have far exceeded the boundaries of a single 256 x 256 meter region.

I'm releasing it with an Attribution-NonCommercial-ShareAlike (CC BY-NC-SA) license. For attribution you can specify "Erik Nauman and The Hewitt School" as the original creators. Only one texture is used aside from the default viewer textures and that is a white marble texture downloaded from CG Textures. The link to the OAR file is here. My students and I would love to hear how anyone uses it, so please leave a comment if you do.
Here's a video of some of the students working.

It’s not the tech that matters

I had the honor and pleasure of moderating a fantastic panel of presenters yesterday at the conference of the NCGS at Wellesley College. The session title was “Creative And Interdisciplinary Uses Of Technology To Engage Girls In STEM” and the panelists were Carolyn Steele, Middle School Math Teacher at Castilleja School in Palo Alto, CA, and Karen Kolkka, Lower School Educational Technologist at Springside School in Philadelphia, PA. Carolyn showed us how she and her colleague, Louise Madrid, integrate Scratch programming throughout the disciplines. They have 7th graders programming science animations that depict and explain DNA replication, challenging interactive math games, and hypercard-like history presentations with embedded animation sequences. Carolyn and Louise have backgrounds in software development so they are able to give their girls a solid introduction to programming concepts and design iteration process. I could learn so much sitting in on their class! Karen showed us animation projects by their lower and upper students using Animation-ish and the Motion component of Final Cut Pro. Their focus is on using tech to combine art and creativity with science, the idea being that their students will understand science concepts more deeply by creating animations that represent causal relationships and develop their personal creative vision through their projects. Then I gave a little demo of our Parthenon sim project
How does all of this tie together? As moderator I talked a little about the difference between patching the leaky pipeline to STEM and creating alternate pathways to STEM, the projects we demo-ed exemplifying the latter. Our common interest seemed to be casting a wider net to draw girls into using technology and engaging them in science, math, engineering, and technology in vital, personal, creative, and interdisciplinary ways. 
A few more points from my comments:
     Effective modeling of technology integration, exemplified by Carolyn and Louise’s use of collaborative co-teaching between those who know the tech and those who know the content area
     Making explicit the connections between the students’ work and work in STEM fields: increasing girls’ confidence in STEM
     Making technology more accessible to girls with meaningful applications in content areas and room for personalization
     Bringing together art and technology to foster greater engagement, understanding of science, other disciplines

Monday, June 20, 2011

OpenSim Diva upgrade

I just finished upgrading my school sim to the latest version of the Diva + Wifi distribution of OpenSimulator, v0.7.1.1. It's a serverless grid setup, so I can shuffle the separate regions around in whatever layout best suits our current needs. The last version of Diva was released back in September, so this was a major upgrade. Aside from the changes mentioned in the release notes (run configure.exe), here are a few changes I had to make between the last version, 0.7.0.2, and this one:

  • FreeSWITCH: My voice service didn't work until I read in the wiki that a path changed in one config file. In the "xml_curl.conf.xml" edit, a folder name changes from api to fsapi. That fixed a FreeSWITCH error I was getting.
  • I could add a start location for new accounts! Open up MyWorld.ini and under the [WifiService] section add this line.
  • In my Mars simulation I had changed the gravity setting to -3.8 so the astronaut avatars can bounce around. Many defaults have been moved out of the Opensim.ini and into separate files. Gravity is still under [ODEPhysicsSettings] but in a file called OpenSimDefaults.ini now. To retain that gravity setting I added an [ODEPhysicsSettings] section in MyWorld.ini with the gravity setting I want.
Those are the biggest things I've had to figure out. Now I have to see what sort of bugfixes have been implemented. Exciting!

Saturday, June 18, 2011

Opensim Guide for Schools

David W. Deeds has created a much needed guide to setting up OpenSimulator in your school. It's more than a step-by-step, including some discussion of the reasons for using virtual worlds in education. Here is the Scribd version (cool, that worked), or you can download a copy from his website. I've only just skimmed it but it looks great, explaining many of the complications one encounters in configuration and setup, as well as covering the options pretty well. IMHO the Diva setup could have been promoted more heavily as I think it's more user-friendly than the main release, since it includes documentation and update utilities. But it also uses MySQL as a default for storage rather than SQLite and he may have thought setting up a db would pose too great a challenge for the average user. Great service he's done, putting this together!

OpenSimulator: School Quick Start Guide

Thursday, June 09, 2011

Learning with Gestures

A sneak peek at Windows 8 reveals that Microsoft wants to integrate its os with tablet hardware to keep up with the huge growth in people's desire for the gestural UI of tablet devices. This should be a much bigger post because there are so many issues this transformation raises for schools but all I can come up with right now is a list of problems to think about and questions:

  • How does learning through apps restrict learning possibilities and how does it facilitate new learning possibilities?
  • Microsoft seems to be trying to simplify the user experience while still providing access to the file system (explorer.exe still exists!) but iOS removes a layer of user control in that sense. What happens to the learner when this level of control is taken away? Granted, file systems are simply TMI to many users, but if you know what you are looking for and aren't allowed access to it that takes away an important level of control over your machine.
  • The rush to gestural UI is happening so fast. My feeling is we're being led into making significant decisions about how best to provide and use technology by consumer preferences. It's way too early to say learning with apps is more effective than learning with software on a more open and transparent os. Of course, both can be effective, but it all comes down to how they are used, and there's still so much to learn about that.
Much more to say, but it will have to come in future posts...

Thursday, March 24, 2011

What Do Girls Want to Do With HTML?

I recently spent a few classes taking my 6th graders on an HTML crash course. I only intended to spend one or two classes on it but they couldn't get enough! It was interesting to see what really got them excited and what the majority of them didn't really care much for. I put together a couple handouts they could follow at their own pace so as the classes went on you started to see the pages become very original creative projects. Here are links to the handouts:
Part I covers text formatting using HTML tags only, no CSS, including font color and font face, heading tags, paragraph tag, block level alignment, and the image tag.
Part II gets more interesting with hyperlinks, fun and simple tricks with JavaScript, like alerts and buttons to change the background color, and finally using the embed and iframe tags to put videos, audio, and other web pages in your web page.
So while a few girls really got into the JavaScript and hyperlinks, what really went viral was the possibility of embedding videos and putting up images they made on some I HEART website using all their friends' names. So for the majority I would say it became a mini social network right there on our school network where they shared videos, photos, and shout-outs with each other. Pretty cool. I was having them save their pages on a network drive and with two other 6th grade classes doing the same project at the same time the pages themselves almost became a kind of social network, since they knew how to navigate to the network folder and see the other pages. Now I'm wishing I had taught them how to hyperlink to each others' pages! That would really have been a social network.

Thursday, February 24, 2011

Understanding Photoshop Documents

I find that my students often have a superficial understanding of aspects of how computers work that persists even after they've been explained. For example, after giving instructions to 7th graders recently to save cropped screenshots they were taking as jpegs to upload to voicethread, I saw one student navigate to her psd file in Windows Explorer and simply change the file extension from psd to jpeg. No, that won't work! I've been doing a lot of research lately about the need to provide visual representations of concepts, especially for girls, who tend to process information in the language areas of the brain rather than the spatial areas. I left it free of text so people can make their own points with the visuals. The main points are layered information vs. compressed "flat" information, Photoshop-specific platform vs. universal program platform, and large vs. small file size.

Photoshop vs Compressed Image from Erik Nauman on Vimeo.