Navigation Controls
Before you get started importing models it's useful to know how to do basics. The navigation controls in the Unity editor are pretty simple once you practice a bit.In the upper left you will find controls to pan the view, move objects, rotate objects, scale objects, and another weird kind of scale that I honestly never use. To rotate your camera view, hold down the option key (on Mac) as you click and drag.
Finally, to see the model as you would in VR, click the run button to open the emulator.
- Hold the option key (Mac) and move your mouse to look around
- Hold option and click to move forward.
Tinkercad Models
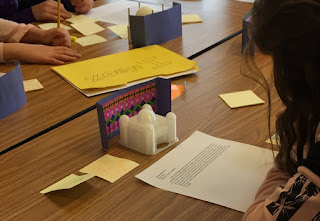
 For a few years I've been coordinating a rich project with fifth grade history teachers in my school for students to design architectural models of culturally important buildings in a country they are learning about, such as mosques in Afghanistan and pagodas in Vietnam. The students create their models with Tinkercad. Usually I spend a couple weeks printing them all and they proudly present them in class. This year I took it a step further and decided to create a VR world of their mosques they could explore, walking around among and inside the buildings as if they were strolling in a city of their creation. I provided a map made of a birds-eye view of the mosques so they could find theirs out of the 47 pieces. That in itself was a good spatial thinking exercise.
To import their models into Unity, you must download the OBJ format of the model, not the STL as you would usually for 3D printing. It will download as a zip file, which you can unzip. The Walking Template I'm providing has an Imports folder in the Assets folder. You can drag the unzipped folder from Tinkercad into the Imports folder.
Inside the model's folder will be a "tinker" object, which you can drag into your environment. You'll notice a few things here:
- the model is sideways
- the model is huge
- the model retains its original color!
Tinkercad is a 3D modeling program, whereas Unity is a game development program. In 3D modeling the Z axis represents height. But in game design Z is depth. Look at the little dimensional legend in the editor screen to see how the dimensions are labeled. If you think of 2D game design X is horizontal position and Y is vertical on the screen, so adding in Z would have to be depth for 3D environments. To fix the model's rotation look in the Inspector and under X Rotation type in -90 and it will lay flat. For Scale type in 0.2 for all 3 dimensions and it will be the size of a large building in relation to the camera in VR.

The OBJ export brings the model's color with it, which is cool! You can mess with its metallic appearance if you want by opening the tinker object in the Hierarchy by clicking the carat next to it (which you probably want to rename by right clicking or clikcing twice to edit) and selecting the contents. You can change the metallic and smoothness amounts in the Shader to get the effect you want.

Beetle Blocks Models
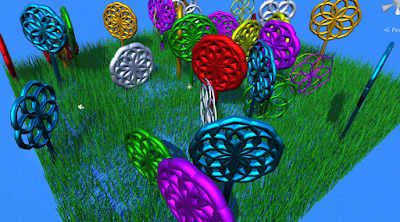
Erin Riley and I had a nice volley of inspirations that led to me imagining what her Beetle Blocks Abstract Artwork Generator would look like in VR. The interesting concept to explore for me is how you can create forms via algorithms and then explore them in a different scale. I've had this type of experience at Dia Beacon with the sculputre of Richard Serra, where you can never experience the entirety of the giant forms, only ever getting a partial view.
| Photo copyright Tripadvisor |
can be imported and explored like this in Unity.
Using Erin's Abstract Artwork Generator as an example, once the script has run, choose Download 3D model as OBJ.
The Walking Template I'm providing has an Imports folder in the Assets folder. You can drag the OBJ file into the Imports folder. Unlike with Tinkercad, the Beetle Blocks export consists of only one file and the color information will be missing.
So the model will be default white when you drag it onto the terrain.
Beetle Blocks swaps the Y and Z axes for you so you don't have to rotate the model the way you do coming from Tinkercad.
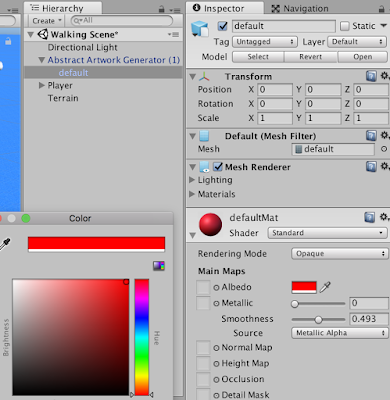
Now how to give it some color? Find the model in the Heirarchy and click the carat to open its contents. Select the default object and open the defaultMat, which is its material. Here you can change its color in the color picker, as well as the metallic and smoothness properties.

One problem is anything else you give that defaultMat material will change as well. If you want to maintain different colors for different object you import do this:
- Go into the Assets folder, and into the Materials folder. Select the defaultMat object there and click Edit > Duplicate.

- Rename the copy by right clicking to the color you're changing it to, then drag that new color onto your model. You can keep creating new colors as needed for new models.
Another problem is the model has to be all the same color, and can't have multiple colors like it did in Beetle Blocks. My solution for that was to just break up the script and export it each time so they can be separate models in Unity.
Other Things You Can Do
Change Your Point Of View
There are a few ways you can change the height from which you are looking at your models. One is to change the camera height. Open the Player object and select GvrMain. Change the Y Position to keep it at a higher vantage point. At 20 meters your model will look like a small design on the ground as you fly high above.
You can build a ramp using rotated blocks. In the Hierarchy click Create > 3D Object > Cube and use the scale tool to stretch it and the rotate tool to rotate it. The player can climb up any slope up to 45 degrees. That limit can also be adjusted if you click Player, and change the Slope limit under Character Controller.
You can alter the terrain to have climbable mountains. Select the terrain, choose Raise / Lower, and choose your strength (opacity). As long as you don't make them too steep you will be able to climb them to see from above.
Change The Sky
The sky colors are set in a skybox object called "custom skybox" in the Assets folder. If you click it you will see that you can change some aspects of it in the Inspector. Make the sky red, go for it!
Add Your Own Textures
You can import any pictures you want and apply them to a model. Just select the model and drag the image from your assets onto the model. It will become a material in the same folder.
Changing the terrain texture is a bit different. After importing the image you want to use, select the Terrain in the Hierarchy, select the paintbrush, click Edit Textures under the Textures panel (I made the default texture in Turtle Art) and click Remove Texture.
Click Edit Textures again, Add Texture, in the Add Terrain Texture panel choose Select, and find your image. One cool thing is you can add multiple textures to the paintbrush and paint each one you select over the default one.
Add Collision Detection
So far the only collision detection available is between you and the ground. You can walk right through the models. Adding colliders to models can be tricky because they won't conform to the shape of the models. But if you want to prevent users from going through things, you can add some basic shapes around them and make them invisible. Here I put a cylinder over this spiral by clicking in the Hierarchy Create > 3D Object > Cylinder and resizing and moving it.
Then in the cylinder's Inspector panel I uncheck Mesh Renderer and it's an invisible barrier.
If you import a LOT of models you might find your VR lagging, dropping to a very low frame rate. For example, I just imported literally thousands of blades of grass I coded in Beetle Blocks. What slows it down is the shadows being cast by the sun. Turning off Cast Shadows on the mesh should take care of that. Another pro tip, turn it off before you copy the model 130 times to distribute more grass over your world!

Ok, another pro tip: maybe it's not the shadows but having too many models period (see the grass below)! This is still quite laggy. The only solution to this is to import one small model, make it a "prefab", and replicate it in different XYZ locations with a script. But this is beyond the scope of this post.


No comments :
Post a Comment