
I just want to use a pile of scrap wood to figure out how to make mallets, making mistakes and honing techniques as I go. It's simple enough I can be successful quickly, yet have a lot of room for improvement. So I'm now on my 4th mallet because I'm excited to see how I can do it better each time.
So, the story of each mallet as it is unfolding...
First Mallet
I don't have pictures of the first mallet but it was a failure. My approach was to glue layers of scrap solid wood and 1/8 and 1/4 inch plywood to make a roughly 3.5 inch block. I used a back saw to cut off all the uneven ends to make a block about 4.5 x 3.5 x 3.5 in. I used a rasp and file to round the edges and corners, and sanded it to a fairly smooth surface. It felt like a lot of work to make just that block.
To make the hole through the middle for the handle I figured I would use the drill press with a 1" spade bit, using trigger clamps to hold the block in place. After lots of smoke and sawdust I was excited to have a hole all the way through. I then set to work chiseling out the hole to make a 1" square channel all the way down. Piles of wood chips later I had chiseled my way through...when I realized I had made the hole through the wrong end! I had drilled along the grain longways. It would be a really funny looking mallet.
To fix this I thought maybe I could saw it in half and make two small mallets that would have better proportions. I did this, glued two longer pieces together for a handle, and started knocking it through. It was a tight fit and I could tell the block was feeling the strain. I kept smacking...and the whole block split open. I could see the weak point was the plywood. So the next mallet would have to be only solid wood.
Second Mallet

This time I glued 4 ~3/4 in scraps of solid wood together--all of this solid wood originally came from bed slats found on the sidewalk by the way--and cut the uneven ends off with a rough cut saw rather than a back saw. Much faster! I drilled the hole with the drill press the correct way and chiseled out the square hole for the handle. I again rounded the edges and corners, and chiseled a wedge piece. I made a cut straight down the middle of the handle, knocked the handle into the hole, and knocked the wedge into the cut in the handle.
Success!
 |
| Wedge in the handle top |
 |
| Wonderful end grain! |
Third Mallet

I jumped into the next mallet excited to put pieces with my students' laser etched TurtleArt designs on the sides as a nice decorative touch. Again I glued together 4 pieces of solid wood and drilled and chiseled out the hole. But then realized I had drilled the hole along rather than across the grain once again (like the first one, not learning from mistakes!). So this mallet has a weird looking proportion, with the head almost a cube, and the end grain facing up rather than in the striking ends where it should be. It's a curious mallet.
Fourth Mallet

This time it dawned on me that I could save myself a lot of work by cutting the two center pieces in half and gluing them at the ends, leaving a 1 inch gap in the center for the handle to go through (see photo below). I did see this in one of the videos I watched so it turns out there are some good tips to heed there. I tried to angle them a bit apart so the hole would be wider at the end the wedge will go in and the wedge can spread the handle apart. Besides the hole the other new thing I did here is not use any glue to secure the handle in the head. It is all held by the pressure of the wedge, which is kind of neat.

Fifth Mallet
For this mallet I am doing the same as above but cutting the corners off to make tapered striking sides. I'm noticing at this point that I have a basic process down and know how to do the steps to make a successful mallet. With that under my belt I'm making a transition to adding details to each new mallet to modify the basic process.

This block is long enough that there's room to taper the ends without making the wood too thin. After sanding it is developing a very nice shape.
 I wanted to toss in a photo of the handle as I worked on it because I've been using a hand plane to even out the pieces I'm glueing together for all the handles and it's been one of my favorite parts of the process. It took a while to learn how to get the cutting depth right on the plane. When it's right and the right amount of pressure is applied it glides along with beautiful curls of wood rolling out.
 So here is the fifth mallet! I like this one.


Sixth Mallet
The new thing I'm trying out on this mallet is making a round handle. I didn't glue the block together with an opening as this was a block I had glued up before and left it in a scrap bin and forgot about it, then rediscovered it. So I figured I would make a round hole and a handle to fit it. I drilled a 1 inch hole on the drill press and this time didn't chisel it out to make it square.


 |
| Ok that worked great! |
 |
| Wedge holding everything tight |
Seventh Mallet
For this mallet I'm trying out making a round head. I didn't know how I would go about doing this but it occurred to me I could try what I did to make the round handle and it worked! The hand plane is working out really well.
 |
| Good start! |
 |
| Rounded nicely! |
 |
| It's a little one. |

Eighth Mallet


Ninth Mallet

I went around school giving mallets away from the collection I've made so far. One of our maintenance guys was psyched, I'm sure he'll get some good use out of it. He got the tapered one. It's nice they will be appreciated by people.
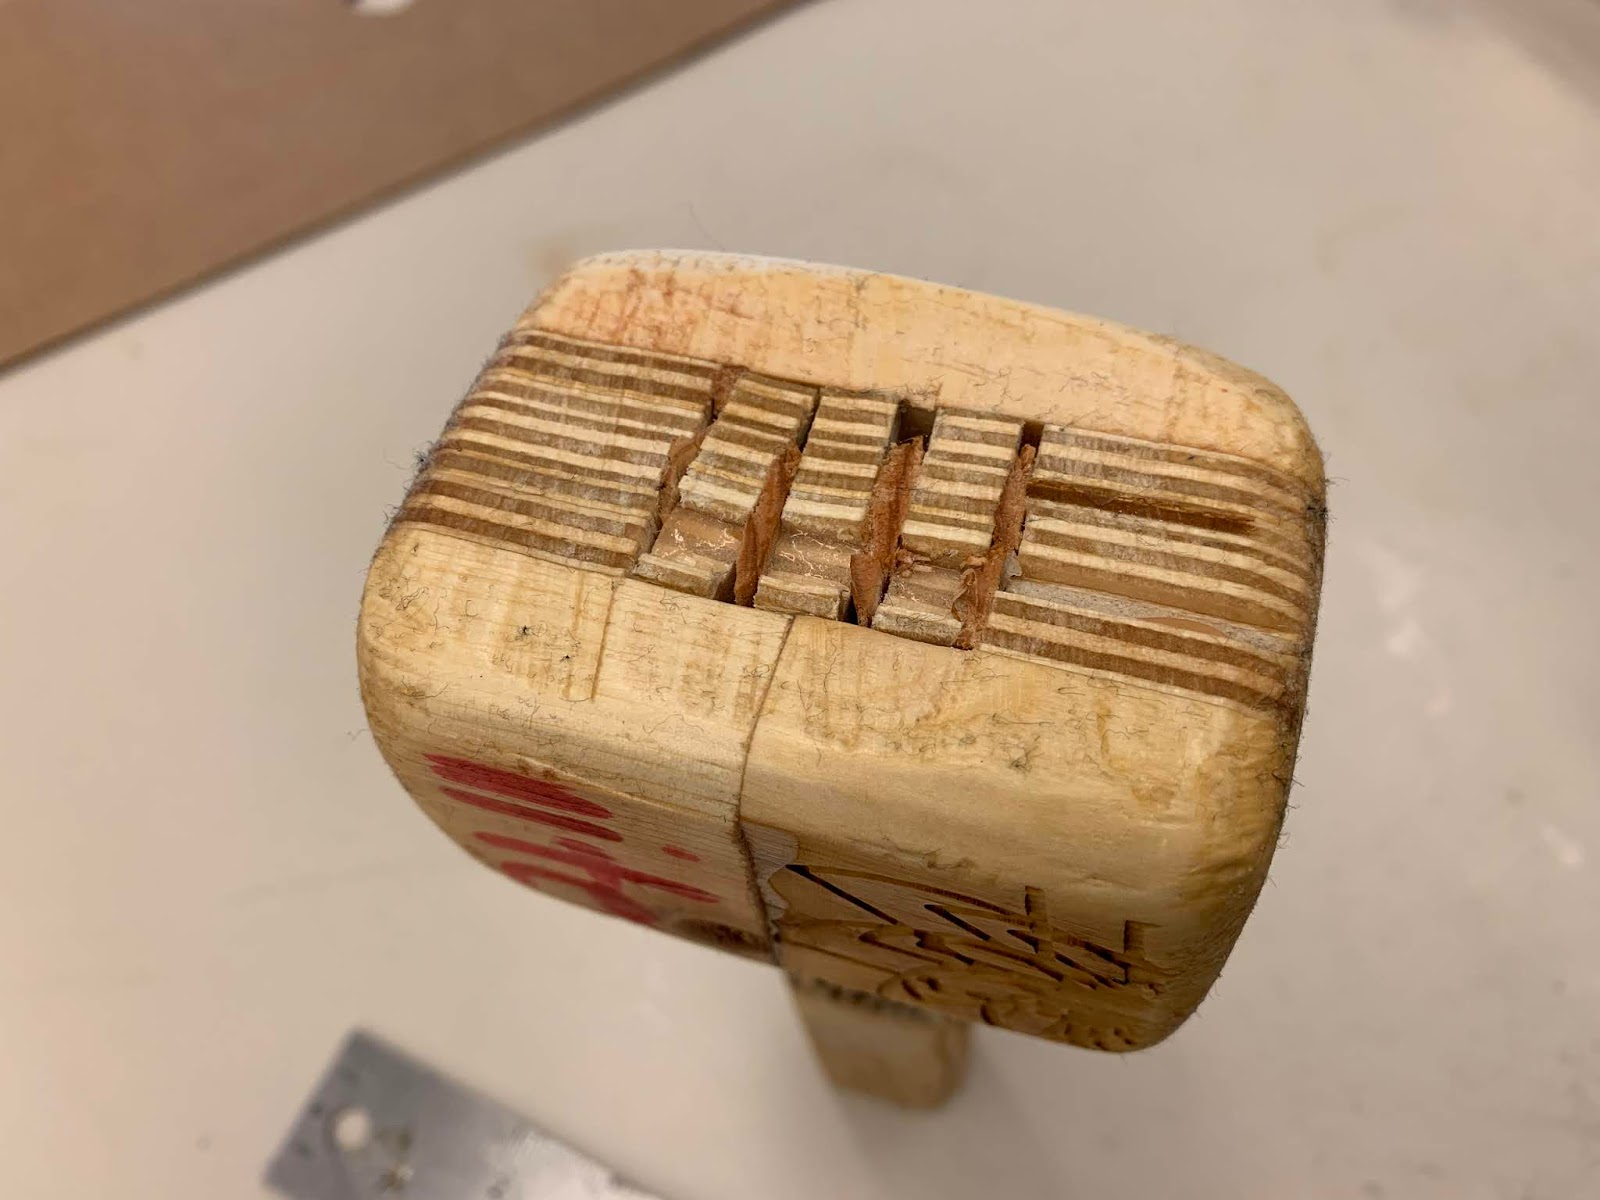
So here I'm in the glue up phase of this next mallet, where you can see I've layered many plywood scraps between solid wood pieces on the outside. The first mallet I made this way split apart when I wedged the top of the handle, but I have a theory that if the direction of force from the wedge pushes the same direction as the plywood, it won't split apart.
For this mallet I also layered plywood scraps for the handle. After planing, sanding, and assembling, this one has the impression of a collage. The many pieces that comprise it are apparent, overlapping each other in random ways. And after driving the wedges in the top of the handle it has held together well, a proof of my theory about where one can put stress on the block. I have since learned from this great video that this is a Laminated Head mallet, being made of several pieces glued together.
I'm deciding this mallet will be the last featured in this blog post as in a way it brings me full circle back to the beginning where I messed up a mallet made of glued plywood because it broke apart when the wedges went in the top. I now know one can use plywood in the head as long as the direction of pressure from within does not push perpendicularly against the plywood. I feel like I've refined my knowledge of mallet making through experience and reflection and understand many more options and possibilities than I did at the outset. I will make many more mallets, I'm sure, but my documentation here is done.


No comments :
Post a Comment